Items List - Employees
Anyone who enters time and expenses, or who manages, monitors or reports on project activities is considered an Employee. What differentiates someone who simply tracks their own time versus the individual who administrates the entire software are the details in their respective employee profiles. For each employee, the profile stores the user’s id, password, security level, their hourly pay/charge out rates and many more useful details. An employee profile must be created for each individual using the software.
Employees are displayed in multiple views (Project Planning tool, Project Assignments, Approved Expense, etc.) as an optional or mandatory selection.
This topic describes how to add an employee using the Items List view. It also details how to enter Leave/Absences information for the employee. Employees can also be added using the Project Assignments view.
|
Note: Employees can also be imported into the database using .csv files with our Import/Export app. You can also use our Active Directory or Microsoft Project views to import employees and should seriously consider using these options if you are planning to use either of these integration tools now, or in the future.
|
Prerequisites:
-
Teams should first be established if you are planning to group employees in a team, department or division.
-
Leave/Absences rules should first be established if you are using the software to accrue vacation, sick leave or other types of leave for employees.
To add an employee using the Items List view:
-
Select Items List from the menu (Menu > Views tab > Employees & Projects > Items List).
-
Select Employee in the drop-down list at the upper left corner of the view.
-
Click the New button  located in the toolbar.
An employee properties window opens.
-
Enter the employee’s First and Last names (up to 100 characters each).
-
Enter the employee's Email Address and Password (case sensitive), up to 100 characters each. If 'Strong Password' has been enabled by your administrator, the password is required to contain at least 8 characters, contain at least 3 of the following character types - uppercase letter, lowercase letter, number or special character and cannot contain the User ID. Employees are able to change their own passwords.
-
(Optional) Select a Team  from the drop-down list. If necessary, select an alternate Effective DateThe Effective Date specifies which date the employee was assigned to this Team..
-
Select a Security levelThe Security level is used to specify the views and features that the employee can access. The list displays five preset security groups plus any additional security groups that you may have created. To add or edit security levels, go to the Security Groups view. from the drop-down list.
-
Select the Software access level for this employee:
-
-
[None]: This employee cannot login to the software.
-
[Time and Expense Entry only]: This employee has access to only time and expense entry views.
-
[All]: This employee has access to administrative and time/expense entry views.
-
From the Limited Access field, select which managers or Access Groups can access this employee. Only the selected managers (or members of the selected access groups) are permitted to view and report on this employee.
Depending
on which limited access operating mode is enabled, either a list of manager
names or a hierarchical tree of access groups is displayed in the limited
access drop-down list. See Notes
that follow.
Check  the
managers (or access groups) who require access to this item. Click
the "check all" icon
the
managers (or access groups) who require access to this item. Click
the "check all" icon  to select all. Clicking the “unselect all” icon
  removes all check marks
except for one manager (or one access group). This is to guarantee
that at least one person can access the item.
removes all check marks
except for one manager (or one access group). This is to guarantee
that at least one person can access the item.
Click
anywhere outside the Limited Access window to close the list.
Steps 10 through 12 detail Employee Rates
Background: Rates are the hourly pay and billing rates assigned to employees. Rates are multiplied by employee hours to calculate client and company costs. If you are not concerned with client and company costs, then rates are not required – proceed to step 13.
-
Company cost = hours worked x rate of wages x overtime prorating
-
Client cost = hours worked x task prorating x rate charged x overtime prorating
-
Enter the hourly Rate of wages value.
- If enabled, select the currency for this rate. For example, 25.00 USD or 16.50 GBP. The currency selection is used when employees are paid in different currencies and there is a requirement to administer, compare and review these costs in any currency.
|
Note: Ignore the More button if you are creating a new Employee. The "More" button is used when editing an existing Employee's Rate of wages, Rate charged or Currency and you want to backdate existing time and expense entries that used this value.
|
|
Warning: If modifying an employee's Currency selection, the rate value should be adjusted accordingly. Example, if modifying an employee pay rate from 30.00 USD to British Pound (GBP), the rate value should be changed to 18.00 GBP. Otherwise calculated costs for existing time and existing budgets could be affected dramatically.
|
-
Enter the hourly Rate charged value.
- If enabled, select the currency for this rate.
-
(Optional) For each rate value described above, select one or more overtime rate options located below the rate value field. Overtime rates apply a prorating (multiplier) to the employee's time entry when there is a requirement to pay/charge out a different hourly rate in special circumstances. For example, 'Time and ½' or 'Holiday Premium'. The Overtime rates selected here are displayed in the employee's time entry tool as an option when entering time.
-
Select a StartThe Start date can represent the day the employee started working for the company or the day the employee started using the system. The Start date is used for historical purposes only. and End dateBy default, this date is preset to the distant future. This could be the date the employee left the company. The End date is used as filtering criteria when generating certain reports. for the employee.
-
(Optional) Check the Flag for archive box if you want to remove this employee from the database the next time the Archive Database function is run. Employee archive checklist.
-
Click Done to automatically save the information and close the window, or click New to save the information and create a new employee.
The employee profile is now created but there are a few other things to do or check before the employee can begin tracking time.
√ Assign projects and tasks for the new employee.
√ Add the new employee to any applicable Approval workflows.
√ Add the employee to relevant scheduled reporting or notification jobs (Job Scheduler).
√ Use the Timesheet Options view to customize the employee’s time and expense entry screens.
√ Review the employee's Working Time and Vacation settings in the Project Planning tool.
√ Send the new employee the company (database) name, his/her User ID, Password and the URL to login to the software.
√ Train the employee how to use the software to enter time and expenses (or use our On Demand Training:http://www.dovico.com/web_timesheet.aspx).
To specify additional employee settings:
The employee properties window's Additional tab permits Leave/Absences rules and Instant Email Notification options to be assigned to each employee. It also permits the employee’s Approval Workflows for submitted time and expenses to be reviewed.
-
Select the employee from the employee list pane and click the Properties  button.
The employee properties window opens.
-
Click the Additional tab located at the bottom of the window.
Reviewing approval workflows for the employee
When an approval workflow is assigned to an employee, that employee’s submitted timesheets are automatically forwarded to the manager(s) designated in the approval workflow. Employees can be assigned to a Timesheet Approval workflow and/or an Expense Approval workflow. Approval workflows are assigned through the Approvals tab in the Approval Workspace view.
-
-
Click the Show Employee Workflows link near the top of the window
The Employee Approval Paths window opens.
-
Details about the information displayed are located in Review Approval Paths.
-
The employee is selected automatically. You can select others using the ‘Employee’ drop-down list at the top of the window.
-
You can review any active sheets awaiting approval using the ‘Sheets to be approved’ drop-down list.
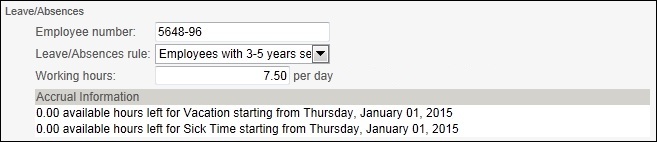
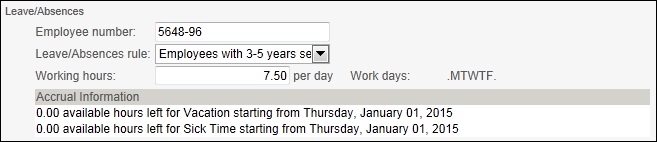
Entering leave/absences information and assigning accrual rules
In this step, an employee number and the number of hours the employee works per day are established. Leave/Absences rules, which calculate the number of sick days, vacation, flex time, etc., that employees are eligible to take, can also be assigned.
|
Warning: If you switch an employee’s Leave/Absences rule, any manual adjustments made to the original rule lost (see step 'de' below).
|
-
-
Enter an Employee Number if applicable. This field is for information purposes only.
-
Select a Leave/Absences rule from the Rule drop-down list.
-
Working hours is the number of hours that the employee works per day. The Working hours per day data is used by the Project Planning tool to schedule work and is used when employee accruals are calculated on a daily basis (see Leave/Absences rules). Note that Working Hours can also be set using the Working Time tab in the Project Planning tool.
-
The Work days are the days of the week the employee works. Work Days are only required if planning projects using the Project Planning tool. These are set using the Working Time tab in the Project Planning tool.
-
When a Leave/Absences rule is selected, the Accrual information window displays, for each accrual, the calculated hours accrued and the accrual start date. Click any row to make adjustments to the Accrue From date for the rule and the number of hours (adjustment) to add to the rule. Click OK when done.
|
Warning: Only 1 Accrual adjustment can be made for each accrual rule. If a second adjustment is required, then this adjustment should be the total of the previous and new adjustments. Example; Joe had a previous adjustment of 10 hours. His manager has granted him 5 additional hours; therefore the new adjustment must be set to 15.
|
-
Click Done to automatically save the information and close the window.
Select Instant Email Notification options for the employee
The Instant Email Notifications options allow an employee to be notified by e-mail whenever time or expenses have been rejected by their approving manager, or to be notified whenever the employee (setup as an approving manager) must approve time or expenses for other employees.
-
-
Check one or more options:
-
-
Notify 'this employee' when there is time to approve: Check this option to send an e-mail to this employee whenever a timesheet is awaiting his/her approval. This option is only applicable if this employee is a designated approving manager for employee timesheets. See Note that follows.
-
Notify 'this employee' when there are Expenses to approve: Check this option to send an e-mail to this employee whenever an expense sheet is awaiting his/her approval. This option is only applicable if this employee is a designated approving manager for employee expenses. See Note that follows.
-
Notify 'this employee' when time/Expenses have been rejected: Check this option to send this employee an e-mail whenever one of his/her time or expense sheets has been rejected.
|
Note: Consideration should be taken before selecting either of the first 2 options: Time awaiting approval or expenses awaiting approval. Either of these options will immediately send an e-mail each time an employee submits a time/expense sheet. If the employee is approving for many employees, then his/her e-mail inbox could be flooded with approval notices. An alternate method is to use the Scheduled Notification feature that will only send 1 e-mail summarizing all time and expenses to be approved.
|
-
-
(Optional) Modify the text used in the Notification e-mail. See Changing Notification text for complete instructions on modifying the e-mail text.
|
Notes:
-
The First and Last names of employees imported from Microsoft Project cannot be edited.
-
For employees linked to Active Directory, the First name, Last name, User ID, Password and E-mail Address fields cannot be edited.
-
Before changing a rate of wages or rate charged, make certain that employees have submitted their timesheets, because changes may affect timesheet entries that have been entered but not submitted.
-
The number of employees displayed in the view is limited by the Paging setting. You may need to click the paging buttons  or or  (at the top of the screen) to view additional pages. (at the top of the screen) to view additional pages.
|
|
Tips:
-
If an employee leaves your company or stops using the software, you can free that license while keeping the employee's data by setting the Software Access field to None.
-
The terms "Employee" and "Rates" can be customized to better fit your company's terminology.
-
Different pay and billing rates can be applied to specific employee, project and task combinations by using the Budget Wizard.
-
Additional tabs are available at the bottom of the employee properties window to add Notes, Phone Numbers and Addresses.
-
To view or edit details for more than one employee, open an employee properties window and use the Next Record button (or Previous) to browse to other employees. Clicking the Next (or Previous) button automatically saves any changes made.
-
Use the Show/Hide column  function to personalize what information is displayed in the employee list view's grid. function to personalize what information is displayed in the employee list view's grid.
-
Double click an item in the grid to see that item's properties .
-
You can add fields to track extra employee information by using Custom fields  . .
-
Use the Filter function to only view those employees assigned to a specific team, security level, etc. to only view those employees assigned to a specific team, security level, etc.
-
-
Use the Find function to locate a specific employee by name.
-
The default selections displayed for Instant E-mail Notifications can be changed using the Notifications tab in the Database Options view.
-
You can modify the Instant E-mail Notification option for multiple employees by using the Update Employee Properties view.
|
|
Warning: If an employee is deleted, all the hours worked for that employee are also deleted. All expenses entered by the employee are deleted. All related information: hours worked for projects, project costs associated with the employee, estimates created for this employee are also deleted and cannot be recovered. Instead, consider using the Archive function as it will effectively accomplish the same as delete, but the employee and all associated information will be stored in a separate, archive database.
|