Calculated Column
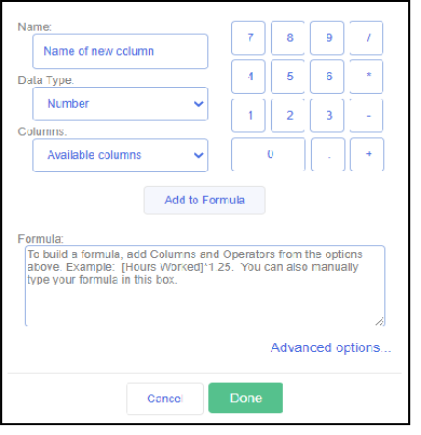
The Calculated Column function is available when you need to add a column showing data based on a formula that you define. Using only the functions available from the interface, you can create formulas by combining columns (data fields) with operators (0-9, +, -, *, etc.). String, numeric and date functions and calculations are possible. For those with SQL skills, even more is possible (Advanced functions).
Creating a calculated column is a 3 step process:
-
Give the new column a name
-
Use the drop-down and numeric keypad to build your formula
-
Select the type of data for your formula's result (number, text, etc.)
Examples:
-
Add a column showing costs + 25%
-
Add a column showing the difference between actual and budgeted costs, hours, etc.
-
Combine 2 text strings together
-
More examples
To add a calculated column:
-
Select the report to modify and click the Edit button.
-
Click the Add button located below the Columns list box.
-
Enter a name for the new column. This is the column heading displayed in the report.
-
Select the Data Type to be used to display the result in the new column (number, date, currency, text or percentage).
-
Build the Formula using the data fields from the Columns drop-down list along with the available operators (0-9, +, -, *, etc.).
Example of adding a column showing Actual Company Costs + 25%
-
From the Columns drop-down list, select Actual Company Costs.
-
Click the Add to formula button. Note: The column selected (from step i) is added to the Formula field at the position of your mouse’s cursor.
This field is displayed in the Formula box.
-
-
Click the multiply symbol '*' from the Operators keypad.
-
Click '1.25' on the keypad.
The Formula appears as [Actual Company Cost]*1.25
-
-
Click Done.
-
Click Run Report to see the results of the calculation.
-
To make a change, click the Edit button and select the name of the calculated column.
-
Be sure to Save the report when satisfied with the new column.
|

|
|
Tip: The Calculated Columns function is also useful if you don't like the name of a column as it appears in a report and want to change that name. In that instance, instead of adding the column for the Available list in the Columns tab, you create a Calculated Column, enter the name you want for the column in the Name field and pick that column from the Columns drop-down list.
|
|
Notes:
-
The items in the Columns drop-down list is defined by your report's data type (the same list as found in the report's Column tab). Some fields are not available because they were created for specific results such as the '% Complete', 'Billable %' and 'Non-Billable %' columns.
-
Note that calculated columns you create are report specific and cannot be automatically shared across multiple reports.
-
Beware building a formula where a Divide by Zero result is possible: If you use the divide operator (/) in a calculated column, beware that any data field (costs, hours, etc.) used as the denominator that has a value of 0 will cause the report to return a 'Divide by Zero' error. Example; if your calculated column formula is 'budgeted costs/ actual costs' and there is a single time entry without an associated actual cost, then the report will fail to run. You can add terms to your formula to bypass divide by zero errors.
|
